I just realized that I’ve been keeping a secret from you all. And it’s kind of important.
It’s my very favourite bruschetta.
I could have sworn that I’ve posted about it before, but I searched (internally) and I searched (on Google) and I couldn’t find it. If indeed I’ve shared this before, I don’t really apologize. Because this is Sunday lunch at Casa Suter pretty much every week from when the tomatoes get good until the tomatoes get bad again. (I’m not sure if I’ve mentioned before, but I really really really hate mealy tomatoes.)
On Saturday I popped into Whole Foods in search of a mango. Usually I don’t go into Whole Foods—I’m on a budget, yo. That being said, I was on a mango hunt, and Whole Foods was on my way home. Now, they failed in the mango department… but these cherry tomatoes for $6 for two pints caught my eye (unfortunately, not local, they are from California).
And immediately all I could think was “It’s bruschetta season!!”
Look at the colours!
The best thing about bruschetta? It only takes four ingredients (six if you count salt and pepper). And a little bit of chopping time. And a little bit of melding time.
And it is delicious. And will make your entire home smell like (I presume) Italy.
And served with a baguette, some cheese and pate you’ve got yourself a perfect Mediterranean lunch. A lunch that can be enjoyed week after week after week (or day after day after day) in the late summer.
Bruschetta
Many, many, many variations can be made on this bruschetta. This simple version is my fave. I don’t have measurements, just taste as you go!
Ingredients
fresh, ripe, non mealy tomatoes (whatever looks best to you this week)
fresh basil
garlic, to taste
olive oil
salt & pepper, to taste
Directions
Dice tomatoes (or, if using small cherry tomatoes—my favourite variation—simply cut each in halves or quarters) and place in a bowl. Tear up fresh basil (to taste) and add to tomatoes. Press garlic (to taste) into mix. Add a tablespoon or two of olive oil (again, to taste). Add a few grinds of salt and pepper. Mix up. Let sit for several hours.
Enjoy on fresh or toasted baguette or other crusty bread. Or by the spoonful. I’m not judging.
My most recent homemade thing? Delicious pizza. (Delicious pizza dough, really, is what I’m referring to).
Like my making of homemade bread, my making of pizza dough was inspired by my friend Graham. Graham is also on a bit of a homemade kick. I didn’t do much googling in this case, and used the vera pizza dough recipe that Graham suggested (from the Tasty Spot), it uses only flour, water, yeast and salt. I love me some simple recipes.
Unfortunately, I couldn’t get myself a pizza stone* in time so the middles were a tad soggy. That didn’t stop the hubs from proclaiming it was the best pizza he’d ever had.
Note on pizza stones: apparently, these can be terribly expensive at specialty stores, and really it’s just a bit of stone. Word on the street is you can pick something up at Home Depot (but be sure not to get a glazed ceramic tile, as the glaze contains lead). Several Home Depots have stopped carrying unglazed tiles, which was the predicament we found ourselves in. We’ve also heard that sometimes Safeway or Home Outfitters has them for about $10. Let me know what you use!
The first pizza was a tomato sauce, shallots, pepperoni, green pepper and mushroom pizza with delicious mozzarella and a bit of garlic (because garlic makes everything extra delicious).
The second pizza had a pesto base, loads of red onions, mushrooms, a bit of leftover green pepper, tomato, goat cheese and a bit of mozzarella. When it finished baking, I topped it with fresh basil (because fresh basil makes most things extra delicious).
These pizzas were scarfed down by the hubs, our friend Ian, and myself and followed up with a trip to Dairy Queen for blizzards. Saturday nights don’t get much better than that, I tell you!
1/2 teaspoon active dry yeast (I used instant and the dough was fine.)
Directions
In a bowl of an electric stand mixer, combine the flours together.
Add the water and mix with a wooden spoon until a dough begins to form.
Autolyse process: let the dough rest for 20 minutes.
Add the salt and yeast.
On the “2″ setting of the stand mixer, mix the dough for 5 minutes with a dough hook.
The dough should be really wet at this point. Pour the dough onto a floured workspace. Use a wooden spoon to scrape all the dough out of the bowl, if necessary.
Lightly knead the dough for a few seconds.
Take the sides of the dough, pull to the middle, and pinch together.
Take the opposite sides of the dough, pull to the middle, and pinch together.
Lightly oil a large bowl and place the dough into the bowl setting the seam side down.
Cover the bowl and let dough rise for 2 hours. The dough should double in size.
Take the dough out of the bowl and place onto a floured workspace. Cut the dough into three or four individual pieces.
Keyhole method: create a “keyhole” with your thumb and pointer finger. Push the dough through the hole (see pictures above) and once all the dough is pushed through, pinch the top together. Repeat for all the pieces of dough.
Lightly oil individual plastic containers and place each dough into its own container. Cover the containers with the lids. Ed: If you are planning on freezing some of the dough, freeze those containers for up to 1 (or 3) month(s), depending on who you ask.
Place the container in the fridge for overnight. One hour before rolling out, take the dough out and let rest. The dough does not have to placed in the fridge overnight, but let the dough rest for one hour before rolling out. Ed: I did the latter and it worked perfectly.
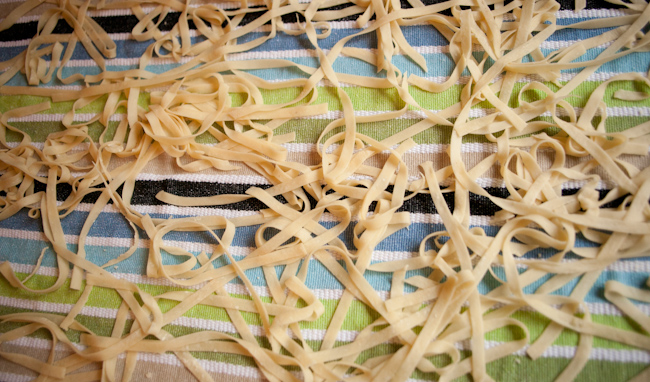
As I mentioned yesterday, on Sunday morning we picked up a sweet pasta maker for $2 from a garage sale. $2 people! (I have just googled said pasta maker, and it may or may not sell for $85 in stores). Pretty much from the moment I bought the pasta maker, all I could think of was homemade pasta. Unfortunately (or fortunately, depending on your perspective) we had dinner plans at The Eatery on Sunday night (and it was fun and delicious) so it wasn’t until Monday night that I got to try out our brand new pasta maker.
At that same garage sale, the hubs noticed a pasta cookbook; in flipping through it he also noticed that there was a recipe & instructions for how to use a pasta maker. Since neither of us has ever used such a machine before, we decided to splurge and buy the book as well (ok… maybe not splurge, the book only cost $0.50).
So. What do you need to make egg pasta? Eggs, flour, and a pinch of salt. Seriously. That’s it. A machine helps, but is not necessary.
To make egg pasta by machine, you simply pile your flour on the counter, make a well in it, break the eggs into the well, add a pinch of salt, and start beating with a fork. This may sound simple, but when your eggs overflow your well, well… it gets a little crazy.
This process takes 2 (and sometimes 4) hands, so I don’t have a ton (ok, any) images of the pasta making process. At then end of it, my kitchen looked like this.
But I’m getting ahead of myself.
After beating the eggs for a bit with a fork, you start mixing with your hands adding in as much flour from the well as needed until the mixture forms a “mass” (seriously, this is how it is described in my cookbook). You’ll know you’ve added enough flour once the mass stops sticking to your hands. Then the fun part begins!
You get to roll your dough over and over and over and over and over and over and over through the rollers of your pasta machine at decreasing thickness settings until your dough reaches the desired thickness. The pasta strips get longer and longer and longer (which is pretty fun), but once they get unruly you can cut them in half. Then you get to roll it through the cutting setting; my machine comes with a wide (fettucine—6mm) and a narrow (tagliolini—1.5mm) setting. I love me some fettucine, so that was my choice for pasta number 1! And boy, did it ever look awesome!
The best thing about fresh pasta? It cooks in about 30 seconds! We combined our fresh pasta with some delicious leftover homemade sauce from a few weeks ago and enjoyed it while watching TV. Seriously people, after making and cooking for all that time, all I wanted to do was the veg with my comfort food. So. Delicious.
Place the flour into the centre of a clean, smooth work surface. Make a well in the middle. Break the eggs into the well. Add a pinch of salt. Start beating the eggs with a fork, gradually drawing the flour from the inside walls into the well. As the paste thickens, continue mixing with your hands. Incorporate as much flour as possible until mixture forms a mass. It will still be lumpy. If it sticks to your hands, add a little more flour. Set the dough aside and scrape the work surface clean.
Set the machine rollers at their widest (kneading) setting. Pull off a piece of dough the size of a small orange. Place the remaining dough between two soup plates. Feed the dough through the rollers. Fold it in half, end to end, and feed it through again, about 7-8 times, turning and folding it over after each kneading. The dough should be smooth and fairly evenly rectangular. If it sticks to the machine, brush with flour. Lay it out on a lightly floured work surface or on a clean dish towel, and repeat with the remaining dough, broken into small orange sized pieces.
Adjust the machine to the next line setting. Feed each strip through once only, and replace on the drying surface. Keep them in the order in which they were first kneaded.
Reset the machine to the next setting. Repeat for each remaining roller setting until the pasta is the right thickness (usually the second to last setting).
Be sure the pasta is fairly dry (but not brittle) or the noodles may stick together when cut. Select the desired width of cutter and feed the strips through.
Separate the noodles, and leave to dry for at least 15 minutes before using.
Bring 1.5 litres of water of water to a boil, salting at least 2 minutes before the pasta is added.
Drop the pasta into the boiling water all at once. Stir gently to stop pasta from sticking together. Freshly made pasta is done as soon as water returns to a boil (if stuffed, cook for 2-3 minutes).
Strain and immediately toss with butter, oil or prepared sauce.
Enjoy. And avoid gaining 200lbs because fresh pasta is so delicious.
Recent Comments